The Object list is positioned at the bottom of the screen. This list displays all of the different objects (layers) in the design as well as the connections between these objects. Each icon in the object list represents one block or function. Items in the object list can be selected by clicking on them with the left mouse button.
Objects can be accessed in either the Block Edit or Select modes. Depending on which mode you are in will determine how you can effect the selection. For instance, you can only re-order blocks in Select mode, while you can only change the embroidery settings in Block Edit mode.
The Object List will be discussed in further detail in subsequent lessons.
 There are a maximum of 3 items that can be displayed in the object lists left column.
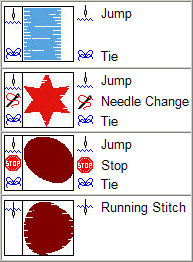
The first (top) item is the connection between the previous block and this block. This is normally indicated by a Jump icon or a Running Stitch icon . This connection is controlled by the Global Connection Policy under the Design Menu or by the Local Connection policy accessible by Right clicking the block in the Object List.
Notice the 2 icons,
 Connection with Jump Stitches. In the Jump icon you can see the needle is above the line which indicates the connection between this block and the previous block was created with a needle UP
 Connecting with Run Stitches. In the second icon you see the needle is below the line, this indicates the blocks are connected with running stitch
 Needle
 ![]() Cut
Cut ![]() Stop The Second item in the left column is the Function code. This can be a Needle Change, A Stop, or a Cut. A Needle Change or a Stop will change the screen color.
Stop The Second item in the left column is the Function code. This can be a Needle Change, A Stop, or a Cut. A Needle Change or a Stop will change the screen color.
 Tie The last icon in the left column is the Tie. This will either be displayed as the Tie icon or there will be no tie icon in the absence of a tie stitch.
This arrangement covers most possible combinations. However, there are additional items that , for the sake of space, are not displayed. For instance. In the event of a thread cut, there would normally be a tie stitch at the end of the previous block as well as the beginning of the current block. As there is no right side column, the ending tie stitch is not shown. There also could be a Cut and a Needle change both applied to a block, However, this is redundant in most cases as the embroidery machine will automatically cut the thread if a needle change is encountered.
The Object list can be moved or floated on the screen as desired, the normal position is across the bottom.
In some cases , a user will try to move or re size the object list and in doing so , will cover the entire working canvas. To restore the object list to it parked position perform the steps outlined in this video